License Revocation Workflow
The following diagram illustrates the license revocation workflow for standalone and network licenses:
The details of each step are as follows:
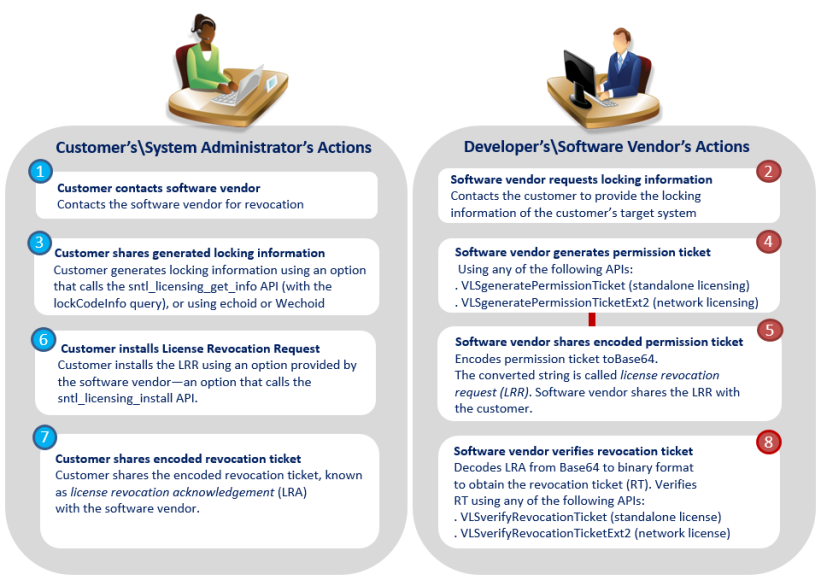
Step 1 - Customer contacts software vendor
The customer sends you a request to revoke specific licenses.
Step 2 - Software vendor requests locking information
Ask the customer to send you the locking code of the machine to which the licenses are locked.
Notes:
>For standalone licensing, the machine must be initialized using the sntl_persistence_create API function prior to license revocation.
>For license revocation, ensure that only a new style locking code is obtained. The locking code must be for locking criteria which are available at the time. Locking code enumeration takes place in case multiple instances of the locking criteria are available.
>All locking criteria except the standard custom support license revocation.
Step 3 - Customer shares locking information with the software vendor
The customer obtains the locking information (locking criteria\selector and the locking code) of the machine to which the license is locked. The permission ticket generated will be created for the same machine.
The locking code can be generated using Wechoid, echoid, or a custom utility that calls the GetInfo API with the lockCodeInfo query. For the API sequence, refer to "Generating Locking Code Using fingerprintInfo and lockCodeInfo" for C, Java, or.NET.
The locking information is passed to the software vendor.
Step 4 - Software vendor generates permission ticket
Use any of the following API to generate a permission ticket:
TIP The gen_permission sample demonstrates the task of permission ticket generation.
>VLSgeneratePermissionTicket - To generate permission ticket for standalone licensing.
>VLSgeneratePermissionTicketExt2 - To generate permission ticket for network licensing.
The permission ticket contains a field “license lines,” which specifies the license strings to be revoked.
Notes:
>The workflow may differ when the lsptgen library is used to perform permission ticket generation and revocation ticket verification tasks.
>For Mac, since the native license generator module is not available, you can perform permission ticket generation and revocation ticket verification tasks on a Windows or Linux machine.
Step 5 - Software vendor shares the encoded permission ticket
The permission ticket is generated in the binary format. You need to convert it into Base64. The resulting encoded string is called License Revocation Request (LRR).
You then pass the License Revocation Request to the customer for execution as described in the next step.
Step 6 - Customer installs the License Revocation Request
The customer uses the License Revocation Request to revoke the licenses on the target machine. This is done with the help of an option or utility that calls the Install API for C, Java, or.NET.
TIP The sntl_revoke sample demonstrates the task of revoking licenses.
Upon revocation:
>For network licensing, licenses continue to exist in the license file. (However, revoked licenses cannot be reused by the License Manager.)
>For standalone licensing, licenses are removed from the license file.
Step 7 - Customer shares the encoded revocation ticket
The Install API returns License Revocation Acknowledgment (LRA), which is a revocation ticket (RT) encoded in Base64 format. Customer shares the LRA with the software vendor.
The following diagram summarizes the terms and their formats (Base64 or binary):

Step 8 - Software vendor verifies the revocation ticket
You can verify the revocation operations performed on the customer machine using the:
>VLSverifyRevocationTicketExt - For standalone licensing.
>VLSverifyRevocationTicketExt2 - For network licensing.
You need to decode the revocation ticket using the VLScgDecodeLicenseRevocationTicketExt API or using the following command in the lsdecode utility:
lsdecode.exe –rt revocation-ticket-file-name